
CHITUBOX Download: The Free Resin Slicer for LCD, DLP and SLA Printers
From the official download to a print file with sound orientation, supports, drain holes and exposure
CHITUBOX is CBD-Tech’s slicer for resin printers. It turns an STL, OBJ or 3MF model into the layer images that an LCD (MSLA) or DLP printer exposes, saved in the printer’s own format such as .ctb or .goo. This CHITUBOX download guide links only to the official page, lists the version on offer for Windows and macOS (checked by hand and dated), and walks through a first print with the physics behind each step: peel forces, suction, islands and exposure, ending with a check in UVtools.
CHITUBOX Download for Windows and macOS
Release notes: CHITUBOX changelog · Earlier builds: Previous Versions
| System | Version listed | Released | File | Size |
|---|---|---|---|---|
| WindowsWindows 10 version 1607 or later, 64-bit | v1.4.0 | 13 October 2026 | .exe installerCHITUBOX_WIN64_Installer_v1.4.0.exe | 704,875,304 bytes (about 705 MB) |
| macOSmacOS 12 Monterey or later | v1.4.0 | 13 October 2026 | .dmg disk imageCHITUBOX_Mac_Installer_v1.4.0.dmg | 1,282,375,138 bytes (about 1.28 GB) |
| LinuxUbuntu | none | – | The manual says the Ubuntu edition is “not ready yet” | – |
Release date from CHITUBOX’s changelog; file names and sizes as CBD-Tech’s download server reported them on 1 November 2026.
Which file do you need?
- Windows: the 64-bit installer is the only Windows file.
- macOS: one disk image, labelled “MacArm” (Apple silicon) on the Previous Versions page; CBD-Tech does not say whether it runs on Intel Macs.
- Linux: no build of the new CHITUBOX. The old Basic 2.3.1 Linux installer (January 2025) remains on the Previous Versions page.
- Old links: chitubox.com/en/download/chitubox-free now opens the home page, with the same button.
Download Safety and How to Verify the File
Start from chitubox.com: its buttons hand you a file from CBD-Tech’s server, download.chitubox.com, through a time-limited signed link. Avoid download portals. No checksums are published on the pages used here, so compare the file size with the table: that catches a cut-off download, not a tampered one.
Windows (PowerShell, in your Downloads folder)
(Get-Item .\CHITUBOX_WIN64_Installer_v1.4.0.exe).LengthFor v1.4.0 this should print 704875304.
macOS (Terminal)
stat -f %z ~/Downloads/CHITUBOX_Mac_Installer_v1.4.0.dmgFor v1.4.0 this should print 1282375138.
General advice, as CBD-Tech does not say how the files are signed: on Windows, check the installer’s digital signature before running it (Properties, or the command below); on macOS, read any Gatekeeper warning before overriding it.
Get-AuthenticodeSignature .\CHITUBOX_WIN64_Installer_v1.4.0.exe | Format-List Status, SignerCertificateWhat Is CHITUBOX?
A resin printer cannot print an STL: it needs an image for every layer plus exposure and motion settings, in the format its firmware reads. CHITUBOX’s manual calls it a free slicer that “slices and converts 3D mesh files into printable files”, with orientation, hollowing, drilling, supports, repair and checks for overhangs, islands and cavities. CBD-Tech of Shenzhen, China, says it was founded in 2014, builds the ChituSystems printer control systems and launched CHITUBOX in 2018.
One program instead of Basic and Pro
The free CHITUBOX Basic (last version 2.3.1) and the paid Pro (2.0.8) had their final releases in January 2025. CBD-Tech’s 2025 test-build notes say they “have been merged into the new software”, which added a paid Advanced level. CHITUBOX 1.0.0 came out for Windows on 26 September 2025; macOS followed with 1.0.1 on 27 October 2025.
| Level | Price | What CBD-Tech lists |
|---|---|---|
| Basic | Free | Unlimited slicing; auto and manual supports, orientation, layout and hollowing; basic repair; 2 build platforms at once |
| Advanced | $9.99 a month or $99 a year | Adds splitting and Boolean tools, more support settings, Magic Support and 100 platforms; 2 computers |
| Pro | $15.99 a month or $169 a year | Adds advanced repair, text labels, freehand batch supports and multi-parameter slicing; 2 computers |
| Team | $299 a year | Everything in Pro, on 5 computers |
A 2025 test build opened all drill parameters to Basic users. The pages used here do not say whether the free level needs an account.
Printers and file formats
The manual’s printer table has 187 printer entries under 23 brand names, led by Anycubic, ELEGOO, EPAX, Phrozen and Creality, plus a custom printer. Each printer has its own output format (some offer two or three): .ctb for many ELEGOO, Phrozen and EPAX models, .goo for newer ELEGOO printers, .prz for Phrozen, .cxdlp or .cxdlpv4 for Creality’s HALOT range and Anycubic formats such as .pwsz. Projects are saved as .ctp. Extras include ChituAction (one-click preparation), ChituManager (network sending) and resin profiles.
What’s New in CHITUBOX 1.4
When this guide was checked on 1 November 2026, the newest release was v1.4.0 of 13 October 2026. It adds Parting (colour regions for planning cuts), overhang markers that automatic supports skip, cavity filling, a global toolbar, image labels for stamps, stacked copies and GPU switching, and fixes lost pixels on printers with pixels of 0.025 mm or smaller.
| Version | Date | Main changes |
|---|---|---|
| 1.3.1 | 19 Aug 2026 | Anycubic Photon P1 Max and HALOT-X1 Neo added |
| 1.3.0 | 9 Jul 2026 | Free Cutting along paths drawn on the model, combining and aligning models; more shortcuts |
| 1.2.1 | 2 Apr 2026 | Bug fixes |
| 1.2.0 | 30 Mar 2026 | ChituGlyph AI models, Boolean operations on several models, GLB and glTF import |
| 1.1.0 | 30 Jan 2026 | Hole direction for drilling, a support parameter centre, Protection Box raft |
| 1.0.1 | 27 Oct 2025 | First official macOS release |
| 1.0.0 | 26 Sep 2025 | First release of the new CHITUBOX (Windows) |
CBD-Tech claims the new program loads models 13 times and finds islands 88 times faster than Basic 2.0; these are the maker’s figures, not ours.
System Requirements
| Item | Windows minimum | Windows recommended | macOS |
|---|---|---|---|
| Operating system | Windows 10 version 1607 or later | Windows 11 24H2 or later | macOS 12 Monterey or later (26 Tahoe recommended) |
| Processor | Intel Core i5 6600K or AMD Ryzen 5 1600 | Intel Core i7 4790 or AMD Ryzen 7 2700X | Not listed |
| Memory | 16 GB | 32 GB or more | 16 GB, 32 GB recommended |
| Storage | Hard disk, 20 GB free | SSD larger than 1 TB | Not listed |
| Graphics memory | 1 GB | 4 GB | Not listed |
Install CHITUBOX
- Windows: double-click the installer and follow the wizard, as the manual describes.
- macOS: open the .dmg and follow the instructions it shows (the manual has no macOS steps), then read any Gatekeeper message before you allow the app.
- First launch: click New Project, then add a printer in Print Information Panel > Printer & Material > Printer. Pick your exact model, click Next and Apply.
Never change the resolution or size of a preset printer. The manual warns that the printer may then report an error when it reads the file.
Updating from Basic or Pro 2.0? A Data Migration window imports your print settings and support parameters when you press “Start Migrate”, now or later from Main Menu > Data Migration.
How a Resin Printer Builds a Part, and Why Prints Fail
This is general resin-printing physics; CBD-Tech’s own articles are named where they are used.
- Expose. The part hangs from the build plate one layer height above the clear film at the bottom of the vat; ultraviolet light through the screen’s clear pixels cures one thin slice. (DLP projects the image; SLA traces it with a laser.)
- Peel and lift. The new layer sticks to the part and to the film. The plate rises, the film peels away and resin flows into the gap.
- Retract and rest. The plate comes back down until the last cured layer is one layer height above the film, and the resin settles before the next exposure.
Peel force: an idealised model
Stefan’s adhesion formula models a layer as a disc of radius R pulled off a flat surface through resin of viscosity η as the gap h opens at speed dh/dt. The film flexes, so read it for trends: double the radius and the force rises sixteen times; it grows with lift speed and viscosity and peaks at the start of the lift, when the gap is tiny. CBD-Tech’s academy uses the same formula.
Islands
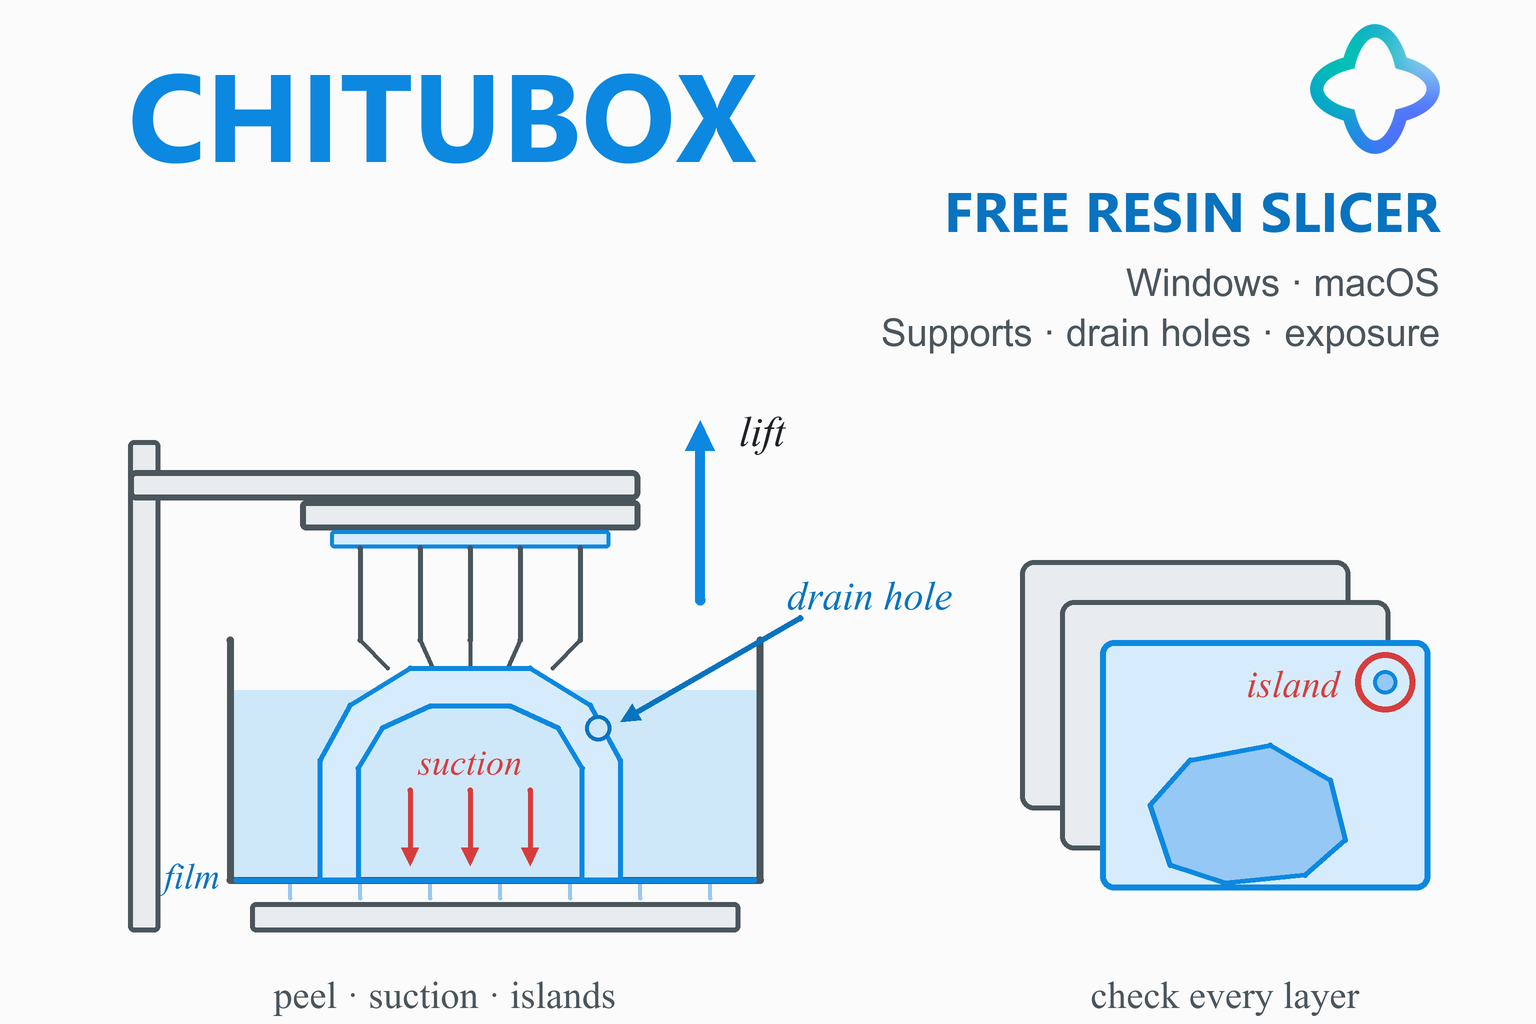
An island is part of a layer that touches nothing in the layer before. It cures onto the film with nothing tying it to the plate, so it stays there or floats. CBD-Tech’s island article lists the results: deformed details, separated layers and cured scraps that can ruin later layers or scratch the film. Support every island on the layer where it first appears.
Suction cups
Pull on a sealed cavity
When a hollow part’s walls touch the film all round, resin is sealed between part and film. Lifting tries to enlarge that space, and as liquid resin barely compresses, the pressure inside falls. A vacuum gives at most about one atmosphere (101 kPa), so a 20 × 20 mm opening (0.0004 m²) could pull with up to about 40 N, the weight of a 4 kg mass; the flexing film keeps the real force lower. CBD-Tech’s article on airtight chambers says the force grows with the cavity’s cross-section, lift speed and viscosity, and that a hole relieves it.
How deep the light cures
The working curve of a photopolymer
The cured depth Cd grows with the logarithm of the light dose E (intensity times time) above the resin’s critical dose Ec; Dp is how far light penetrates. Doubling the exposure adds only about 0.7 Dp of depth. Curing deeper than one layer bonds the layers, but extra light also spreads sideways: over-exposed prints have swollen details and tight holes.
Slice Your First Resin Print in CHITUBOX, Step by Step
Following CHITUBOX’s quick start, with a new project and your printer added:
- Load and check the model. Use Main Menu > Open (Ctrl + O) or drag the file in. Repair > Error Detection finds inverted normals, holes and loose shells; Model Repair > Basic Repair tries to make the model manifold. STL files carry no units, so check the size. Fix badly broken meshes first in MeshLab or Blender.
- Orient the part. Prepare > Orient does it automatically. Aim for small layers that change size gradually, with visible faces away from supports. The quick start says not to support a large flat face parallel to the plate: tilt it or put it straight on the plate. For flat faces, CBD-Tech’s academy gives the angle arctan(layer height / pixel width): 45° when both are 0.05 mm. Tilting adds height and print time.
- Hollow it and drill drain holes. Prepare > Hollow sets wall thickness, mode and infill; thinner walls save resin but are more fragile. Add holes with Drill. As a general rule, put one at the end of the cavity nearest the build plate: it prints first, so it relieves suction while the cavity is open to the film and lets air in once the part leaves the resin. A second hole at the far end lets you rinse it. Cavity Detection (Visibility Control Center) confirms no sealed cavity remains.
- Add supports. Supports > Auto Support is the quick start’s first choice. Decrease Contact Point Spacing for denser supports; +Platform mode grows supports from the plate only; set the raft and Model Lift Height. Then run Supports > Overhang Detection (medium or high accuracy) and add manual supports where needed.
- Set exposure and lift. In Printer & Material > Printer > Edit, Print tab, start from your resin maker’s values. The manual calls 0.05 mm a typical layer height and 4 a common bottom layer count; bottom layers get a much longer exposure to bond to the plate. Add transition layers, a rest after retract and a slow first lift phase, when peel force peaks.
- Slice, check and save. Export > Slice, then Detect Islands: islands are listed by layer and shown in red. Support real islands rather than deleting them, then Slice and Save to USB or send with ChituManager.
Support settings: density, tip size, contact depth
| Setting | What it changes | The trade-off |
|---|---|---|
| Density (Contact Point Spacing) | Each tip carries about an s × s patch, so halving the spacing s gives four times as many tips, each with a quarter of the load. | More marks to sand. CBD-Tech advises spreading supports evenly. |
| Tip size | Contact area is πd²/4: a 0.4 mm tip has 78% more area than a 0.3 mm tip. | Holds better, leaves a bigger scar. |
| Contact depth | How far the tip sinks into the surface. | Deeper joints are stronger and leave deeper pits. |
| Contact shape | A sphere at the tip, or none. | CBD-Tech’s test: sphere tips removed and sanded more easily; plain tips were stronger but pitted brittle resin. |
| Light, medium, heavy | Ready-made sets of values. | CBD-Tech: light for easy removal, medium for most overhangs, heavy for large or load-bearing parts. |
The stress in a tip is pull divided by area, as in our stress and strain calculator. CBD-Tech’s support guide adds that an overhang under 45° from vertical, or a bridge under about 5 mm, may print without supports, depending on printer and resin.
Transition layers: the manual’s worked example
With 25 s bottom and 2.5 s normal exposure and 4 transition layers, CHITUBOX uses 20.5, 16, 11.5 and 7 s; the manual says this reduces the risk of cracking above the bottom layers.
Finding the exposure: CBD-Tech suggests starting slightly over-exposed and printing a hole and a shaft; in its test, too short an exposure gave a loose fit and too long a tight one.
Check the Sliced File in UVtools
UVtools is a free, open-source program (AGPL-3.0) that opens the sliced printer file itself, not the .ctp project, and examines every layer. It is a quick second opinion after CHITUBOX’s own checks.
- Open the sliced file. The README lists the CTB family (which it calls “ThickBox”) and formats such as GOO, PRZ and CXDLPV4. If a brand-new CHITUBOX file will not open, update UVtools.
- Detect the issues: islands, overhangs, resin traps, suction cups, touching bounds, print height and empty layers, according to the README.
- Read them with the physics in mind. An island or overhang needs a support; a suction cup or resin trap needs a drain hole; touching bounds means the part reaches the edge of the print area.
- Fix the cause in CHITUBOX and slice again. Our suggestion: UVtools can repair some issues, but supports and holes are best added in the slicer.
Print Settings Worth Knowing
| Setting | What the manual says | Why it matters |
|---|---|---|
| Layer height | 0.05 mm is typical; thinner is finer but slower. | Each layer must cure deeper than its thickness to bond. |
| Bottom exposure | Longer exposure can improve adhesion but may over-expose and lose detail. | It also widens the base; Bottom Tolerance Compensation corrects that. |
| Rest after retract | Lets the resin settle; the manual says it “can be relatively critical”. | Resin still moving during exposure gives weak or uneven layers. |
| Lift and retract | Distance and speed for bottom and normal layers, each in two phases. | Peel force rises with speed, so lift slowly while the layer is on the film. CBD-Tech’s curling article also advises a lower lift speed. |
CHITUBOX and the Tools Around It
| Tool | What it does, from official sources | Where it fits |
|---|---|---|
| CHITUBOX | Slices models for SLA, DLP and LCD resin printers, with supports, hollowing, repair and detection | Every resin print |
| UVtools | Checks, repairs and converts sliced resin files | After slicing |
| MeshLab | Edits, cleans, heals and inspects triangle meshes, including for 3D printing | Before slicing, for scans and broken meshes |
| Blender | CBD-Tech’s academy uses it to flip normals, fill holes and thicken open surfaces | Before slicing, when automatic repair is not enough |
CHITUBOX is for resin printers only. For filament printers, see our overview of 3D printer slicers.
Pros and Cons
Strengths
- Free level with unlimited slicing, auto supports, hollowing and drilling.
- 187 printer entries under 23 brands in the manual.
- Overhang, island, cavity and collision detection built in.
- A detailed manual and academy articles on the physics.
- Eight releases from September 2025 to October 2026.
Limits
- No Linux build of the new CHITUBOX.
- Magic Support, splitting, advanced repair and multi-parameter slicing are paid.
- 16 GB of memory at minimum; downloads of 705 MB to 1.28 GB.
- No checksums or release feed.
- The manual lacks macOS install steps and detail on support tips.
Troubleshooting
| Problem | What to try |
|---|---|
| The printer cannot read the file | Check you chose your exact printer and did not change the preset’s resolution or size. |
| The printer does not see the USB drive | The FAQ for the older Basic recommends FAT32, USB 2.0, 16 GB or smaller, allocation unit 2048 bytes. |
| Islands after slicing | Add supports or change the orientation; a deleted island is simply not printed. |
| A hollow print has pits or broke | Suction: add a drain hole near the build-plate end and run Cavity Detection. |
| A hollow print cracked days later | CBD-Tech names resin left inside, incomplete post-curing, internal stress and brittle resin. |
| The base curls or the print falls off | CBD-Tech suggests a lower lift speed, an adjusted rest time and a clean, level plate. |
| Supports break | Denser supports or a heavier preset, a slower lift, cross bracing on tall supports. |
| Holes too tight, details swollen | Over-exposure: shorten it, then fine-tune with tolerance compensation. |
| ChituManager cannot find the printer | Its FAQ: same subnet, firewall allows ChituManager, file names without non-English characters. |
Frequently Asked Questions
Is CHITUBOX free?
Yes, at the Basic level, which includes unlimited slicing, supports, hollowing and basic repair. Advanced, Pro and Team are paid subscriptions; on 1 November 2026 Pro renewed at $15.99 a month or $169 a year.
Where can I download CHITUBOX safely?
From chitubox.com: the CHITUBOX product page has the “Download For Free” button and the Previous Versions page lists earlier builds. Both serve files from CBD-Tech’s server, download.chitubox.com. Avoid download portals.
What is the latest version of CHITUBOX?
On 1 November 2026 the newest release in CHITUBOX’s changelog was v1.4.0 of 13 October 2026, for Windows (64-bit) and macOS. Check the changelog for anything newer.
What happened to CHITUBOX Basic and CHITUBOX Pro?
CBD-Tech merged them into the new CHITUBOX, released on 26 September 2025; the last separate versions were Basic 2.3.1 and Pro 2.0.8 (January 2025). A Data Migration window can import your old settings.
Does CHITUBOX run on Linux?
Not the new CHITUBOX: its manual says the Ubuntu edition is “not ready yet”. The old Basic 2.3.1 Linux installer is still on the Previous Versions page, but it belongs to the previous generation.
Does CHITUBOX run on a Mac?
Yes, since version 1.0.1 (October 2025), on macOS 12 Monterey or later with at least 16 GB of memory. CBD-Tech’s pages do not say whether the disk image, labelled “MacArm”, runs on Intel Macs.
Which file formats does CHITUBOX use?
It loads STL, OBJ and 3MF (plus GLB and glTF since 1.2.0) and saves projects as .ctp. The sliced format depends on the printer, for example .ctb, .goo, .prz, .cxdlpv4 or Anycubic’s .pwsz.
Which printers does CHITUBOX support?
The manual lists 187 printer entries under 23 brand names, including Anycubic, ELEGOO, EPAX, Phrozen and Creality, plus a custom printer. Do not change a preset’s resolution or size, or the printer may not read the file.
Why does a hollow resin print need drain holes?
Walls that touch the film all round seal resin between part and film, so lifting creates suction that can crack walls or tear supports. A hole near the build-plate end relieves it; a second lets you rinse out resin that could crack the part later.
Can I check a CHITUBOX file in UVtools?
Yes. UVtools opens sliced files such as CTB, GOO, PRZ and CXDLPV4 (not the .ctp project) and finds islands, overhangs, resin traps, suction cups and empty layers. If a brand-new CHITUBOX file will not open, update UVtools.
More guides: UVtools · MeshLab · Blender · Best 3D printer slicers · FreeCAD · OpenSCAD · Stress and strain calculator · Engineering calculators